6.A.2) How owners can change Teacher Mgrs for student(s)

First, you’ll disconnect from current Teacher Mgr, then you’ll connect to a new Teacher Mgr.

NOTE: There is a button to “Update Database” that allows you to change a lot of records all at once–say at the start of a new school year.  Here is the link to the help page about the “Update Database” function.

For Individual students use the green Individual Action Button

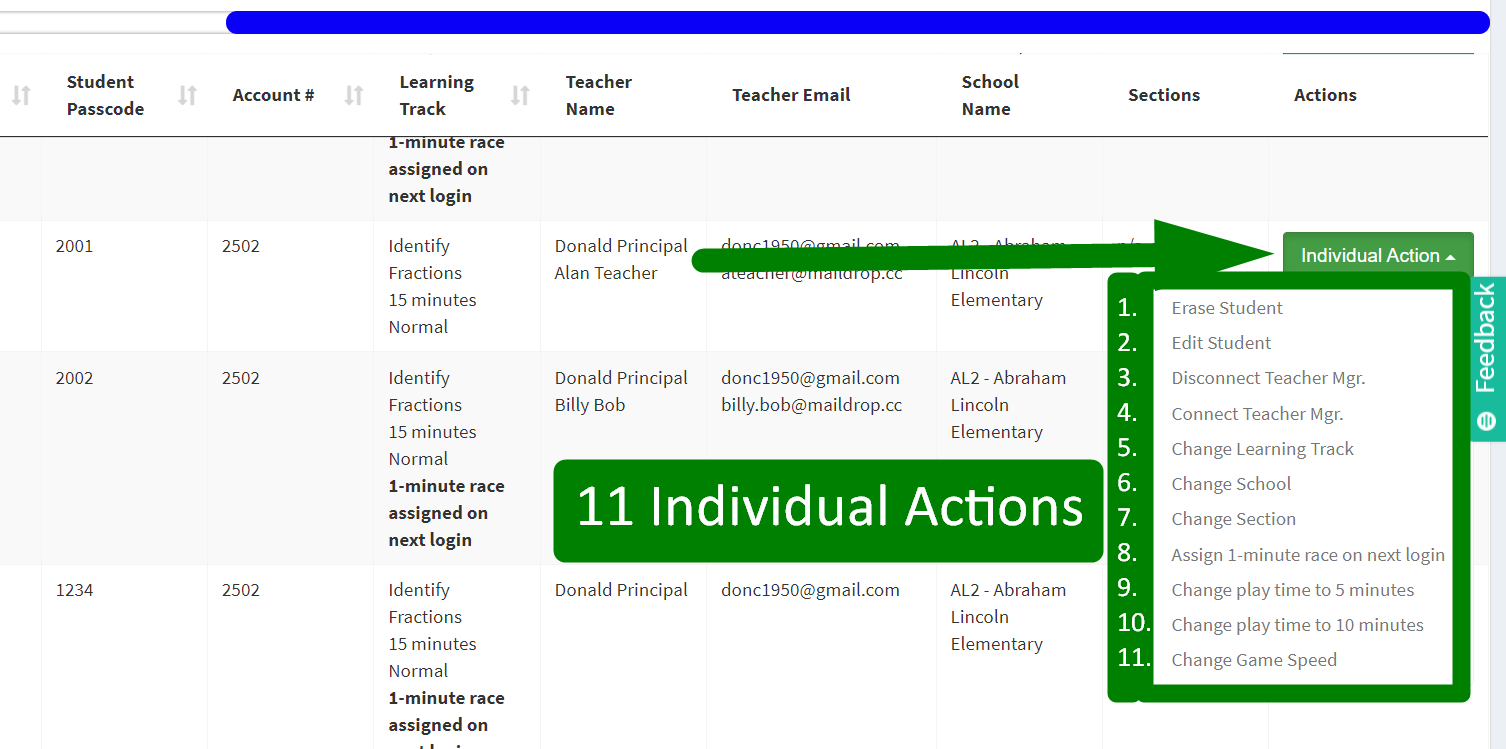
When you want to change something for an individual student, go to the green button at the end of that student’s row that says Individual Action.”  Pull down for a short menu, outlined in green in this picture.

Step 1: First Disconnect Teacher Mgr.

Only the owner (AKA Subscription Manager) can change Teacher Mgr.  Teacher Mgrs cannot do this.  If you are the owner/subscription manager for your school you can change Teacher Mgrs for an individual student. Begin by choosing “Disconnect Teacher Mgr” from the Individual Action button.  This makes the student a sort of free agent (Teacher Name becomes n/a) so you can assign a new Teacher Mgr.

Step 2: Connect to a new Teacher Mgr.

This function is only available when a student is a free agent (when the Teacher Name is n/a) and therefore needs a Teacher Mgr. You click on it, and  this pop-up appears with a list of the available Teacher Mgrs in your account.  Choose the one you want and hit the green Connect button.

Only students who are free agents (who have n/a in the Teacher column) can be connected to a Teacher Mgr.  Be sure to “select” the students you want to connect to a new teacher.  After you have selected them go to the orange Bulk Actions button, pull down and you’ll see “Connect Teacher.”  Choose that action and a pop-up will give you the options of Teacher Mgrs in the account (see the picture).  You have to pull down to see who all is available, but then select one and hit the green “Connect” button to make it happen for all the students you had selected.


For groups of students use the orange “Bulk Actions” button.

First, select the students to whom the orange ‘Bulk Actions’ button will apply

When you want to change something for a group of students, you will use to the orange button on the right side above the names that say “Bulk Actions.”  You will first have to select the students to whom the bulk action should apply.  We’ll explain the functions below.

First select the students you want to affect. 

To select the students put a check mark in the little box at the left hand side of their row.  If that will be tedious, you can check the Select All box, a check mark will go onto all the students showing on your screen.

How many at a time do you want to see?  Above the word Select you can choose how many of your students you want to show at a time on your screen.  The options are: 10, 25, 50, 100 or All.

Or use the search bar to select who you want to see in your display.  You can use the search bar to limit who shows up–for example entering a teacher’s name will display only her students.  Then you can use “Select All” to put a check mark only in front of that teacher’s students.

Remember: on the Bulk Actions button somebody has to be selected (have checkmarks in front of their name) or nothing happens!

Step 1. Disconnect Teacher Mgr(s)

First select the students you want to change Teacher Mgr(s).  The first step in changing the Teacher Mgr. for a group of students is to make them  free agents.   Pull down and click on “Disconnect Teacher.”  Now the student or students are sort of a “free agent” if you will. In the place in the dashboard where it used to say the name and email of a Teacher Mgr it now says n/a.

Step 2. Connect Teacher Mgr(s)

Only students who are free agents (who have n/a in the Teacher column) can be connected to a Teacher Mgr.  Be sure to “select” the students you want to connect to a new teacher.  After you have selected them go to the orange Bulk Actions button, pull down and you’ll see “Connect Teacher.”  Choose that action and a pop-up will give you the options of Teacher Mgrs in the account (see the picture).  You have to pull down to see who all is available, but then select one and hit the green “Connect” button to make it happen for all the students you had selected.


This entry was posted in . Bookmark the permalink.

Leave a Reply

Your email address will not be published. Required fields are marked *