How Can We Help?
(C) Import student logins using a CSV file
![]()
![]() Individual teachers can easily roster their own class (without importing a CSV file) by adding Rocket Math from the ClassLink or Clever Library.
Individual teachers can easily roster their own class (without importing a CSV file) by adding Rocket Math from the ClassLink or Clever Library.
Find Rocket Math icon in ClassLink Library or Clever Library
Step 1. Do you have seats to which to assign logins?
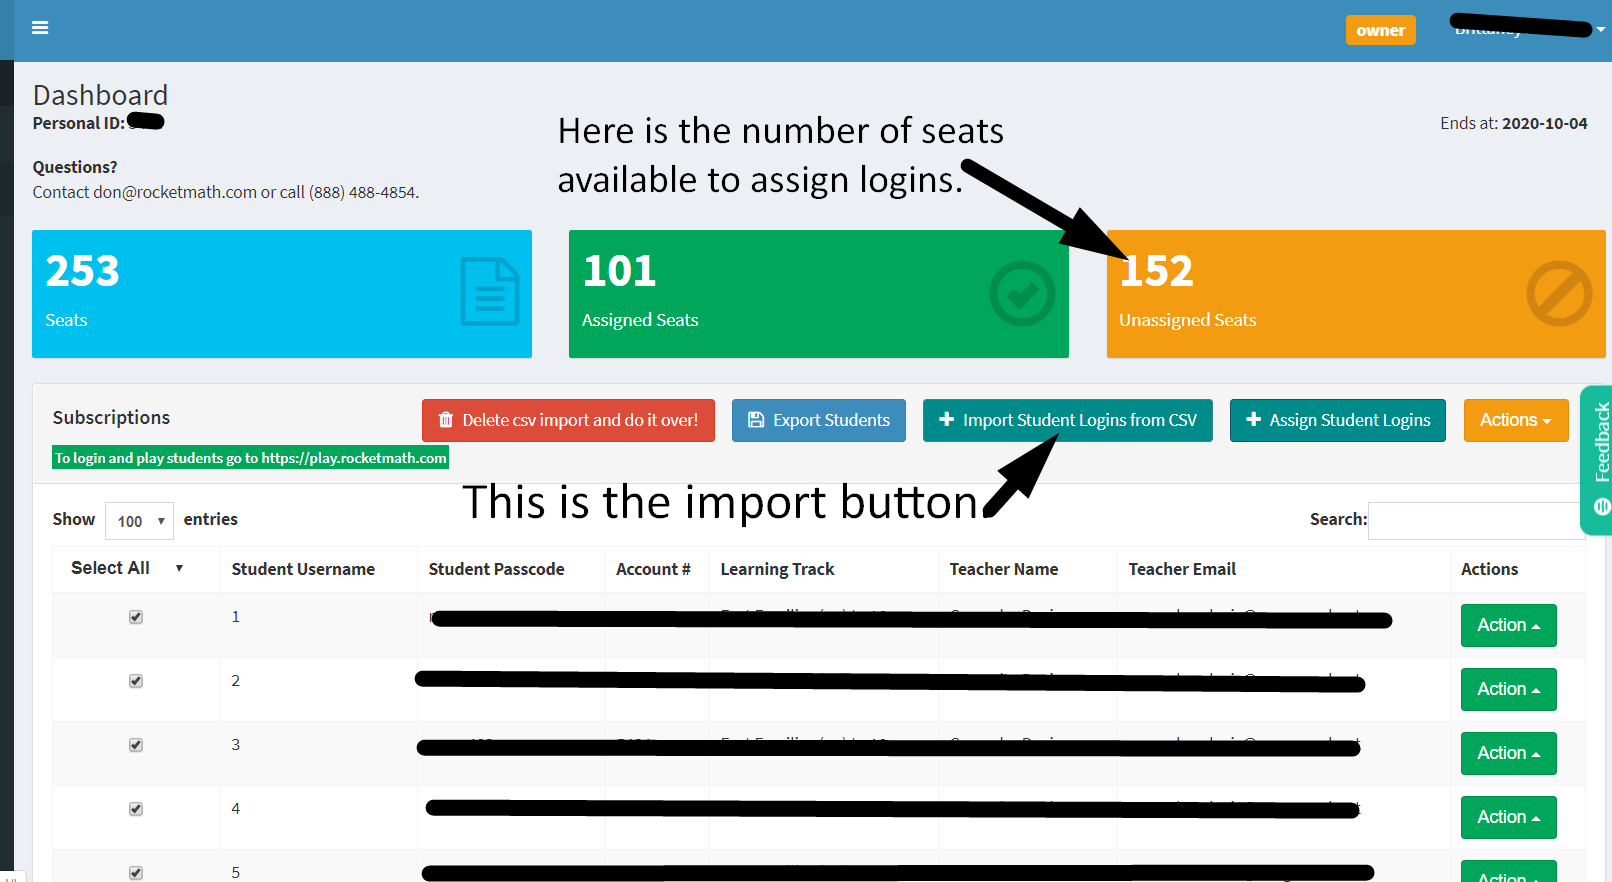
For owners the orange box on your dashboard shows the number “Unassigned Seats” you have that can be assigned to students.
For Teacher Mgrs, the blue box shows the number of “Available seats”–available for you to assign to students by setting up logins.
Read below or watch this video of how to do this.
Get started with the + Import Students Logins From CSV turquoise button.
Step 2.–You need to set up the school name and code
To use the CSV import template, you will need to set up a three-character School code. Go here for the directions on how to add schools and school managers to your account. Please, you must do this BEFORE adding students–so you have a school code to assign the students to the school.
Step 3.–Have you set up Teacher Mgrs?
If you have more than one classroom of students, you will need to assign students to Teacher Mgrs. So you first need to Add Teacher Mgrs to the account. Please read and follow the directions about How to Add More Teacher Mgrs to your account BEFORE you start to assign login information to students.
Plan A: Why not delegate?
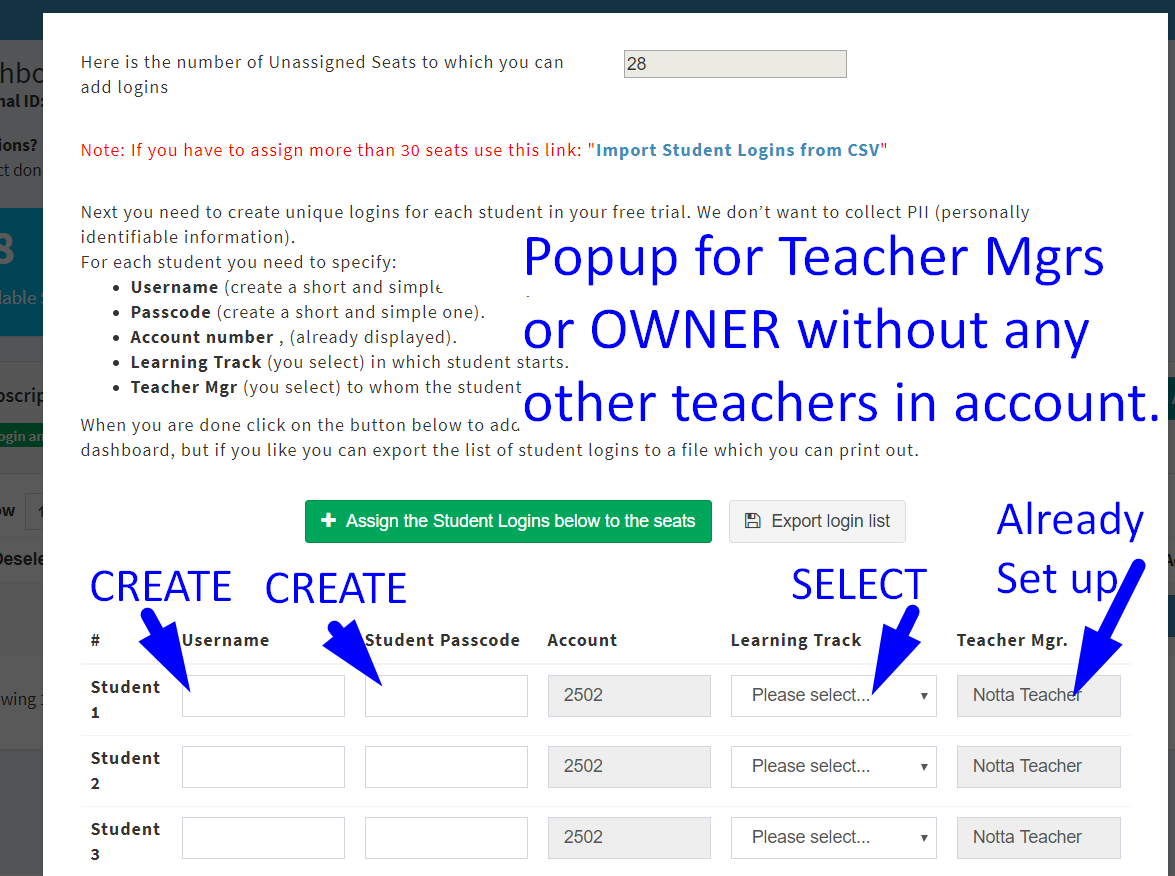 If you have Teacher Mgrs, you can delegate the creation of logins to your teacher mgrs, once you have created them. They can each go to admin.rocketmath.com login to their account and see this popup.
Your Teacher Mgrs can then put in up to 30 student logins on their own. The usernames have to be unique to your school, but if they use a unique Teacher number and a nickname, (such as 4Alfie, 4Billy, 4Cathy) it should not be hard. As the owner of the account, you’ll still be able to see all the students and review their progress, but you don’t have to enter all the logins yourself.
When Teacher Mgrs open their account and access this popup it already has their name as the Teacher Mgr. It is much easier to do Plan A and delegate this to your teachers than to do a school-wide CSV file.
Plan B: To import student logins with a CSV file–do the 3 tasks below.
Click here to see video demonstration of how to do this or follow the directions below.
You will see this pop-up page labeled “Import Student Logins From CSV” looks like this without the numbers to guide you .
Task 1. Open our template and put your student data on it
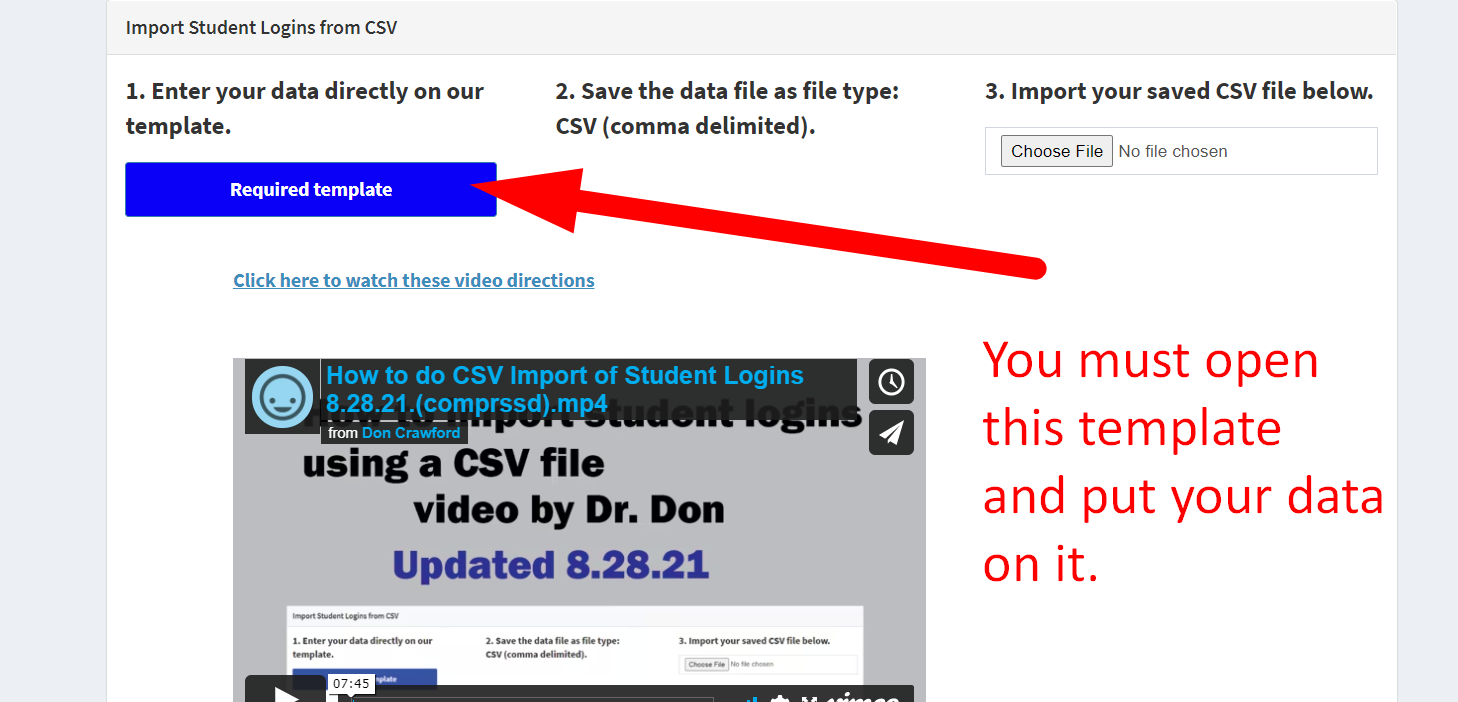
Begin at #1 click on the bright blue “Required template.” and click it to get the latest, and most properly formatted template for starting your student file.
!!! (Please, you must start with this template and fill in the fields and then save with your name. The system is expecting these headings. Don’t just make up your own file because it won’t work!) Really! It will never work. A lot of people go wrong right here. Start with our template.
See what the blank Excel template looks like below.
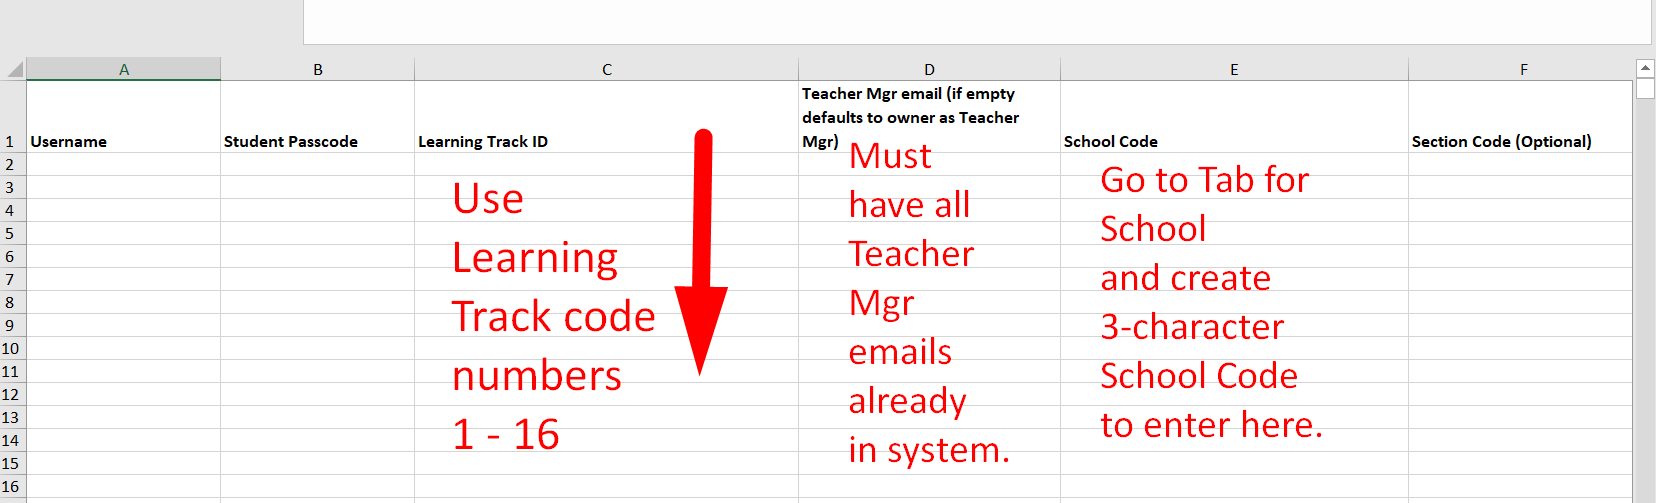
Username.
You’ll create a username for each student. We do not want to collect personally identifiable information on your students, so we don’t want their actual full names. But make sure you know who goes to which username. Only you need to know, we don’t.
Passcode.
You’ll create a passcode for each student. Make it short! Don’t make them all the same to avoid students being able to hack into and work in each other’s accounts.
Learning Track numeric code 1 to 16–not the name.
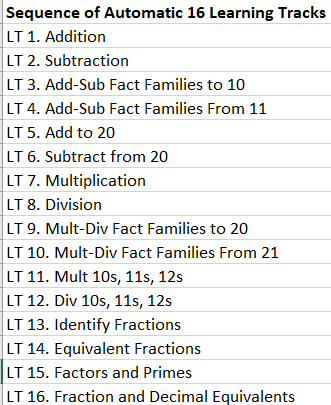 Enter the code number, and only the code number (1 through 16), for the Learning Track they will start in. Most people begin students in (1) Addition or (7) Multiplication. You can change it at any time. Click here for the directions page about Learning Tracks if you need help deciding. The computer will not understand the name of the Learning Track.
Teacher Mgr email.
1. CAREFUL! You must have added your Teacher Mgrs into your account first–before trying to import this CSV. Here are the directions for how to add Teacher Mgrs and their emails to your account.
2. After adding them to your account, on the CSV add the Teacher Mgr’s email address to connect each student to their Teacher Mgr. If you try to import with Teacher names rather than emails or if a single one of those emails is not in the system the same way–the import will not work!
School Code.
This is NOT your account number. This is the school code you should have created already on the orange School/School Manager tab (see below.)

The CSV import will not work without it. If you haven’t set this up yet, go here for directions on how to add a school name and school code.
Sections Codes.
The Sections code in Column F can be blank if you don’t need to set up sections in your school.
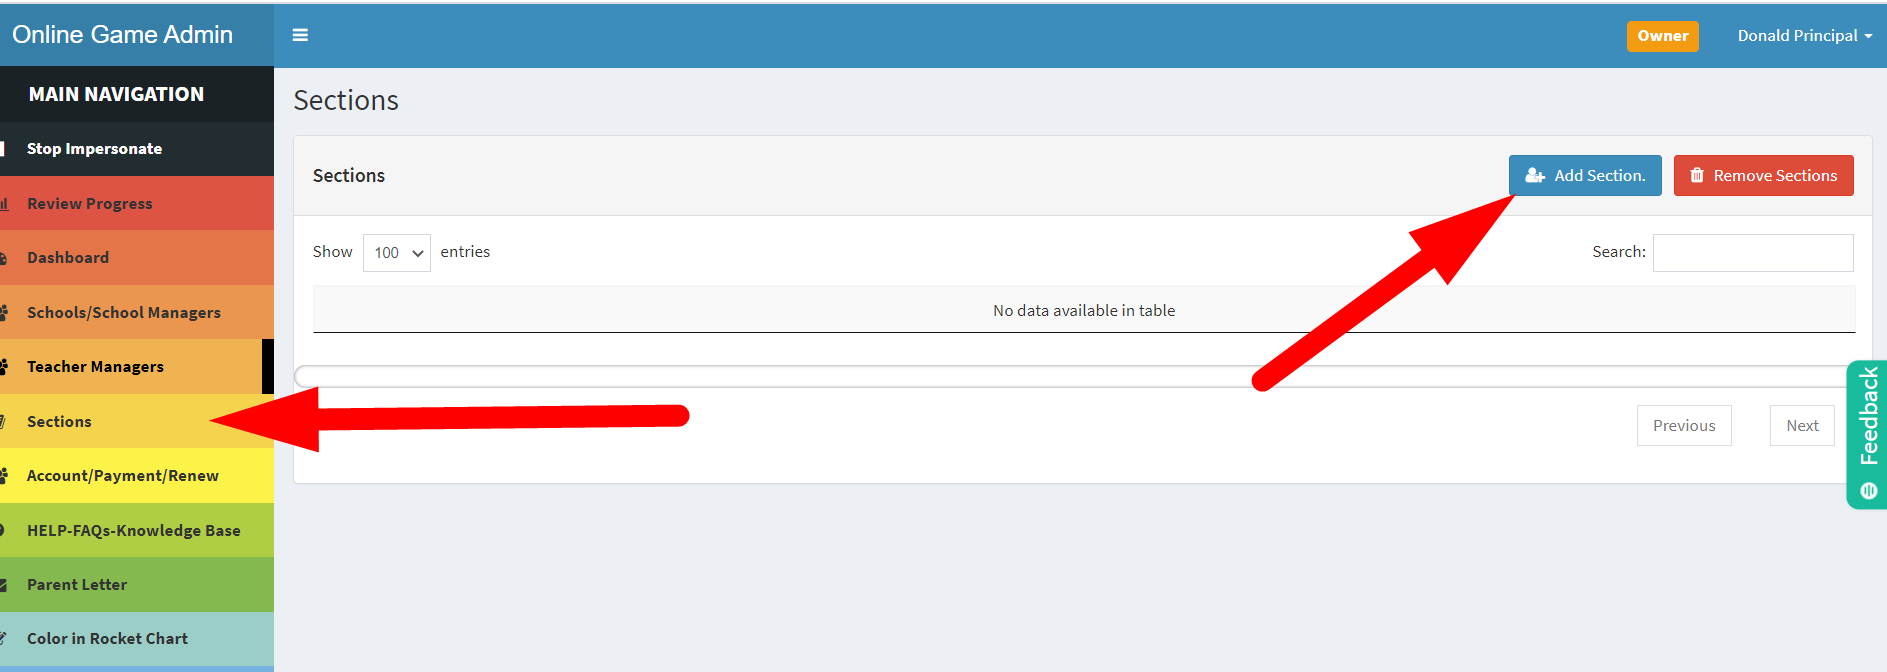
But, if your teachers have more than one class, you need sections so they can see one group at a time. There is a sections tab on the rainbow navigation where you set those up. Here are the directions for how to set up sections–which you have to do before you can do the CSV import. If you have sections the code you created goes into Column F in the CSV. The sections won’t work and the file won’t import unless:
- The Teacher Mgrs are connected to their sections–you can edit in the Teacher Mgr tab.
- The Sections were created in your account with a code you are using in the CSV.
- The Sections are connected to the school–you can edit in the Sections tab.
Task 2: Do a “SAVE AS” and choose CSV (comma delimited) as the file type.
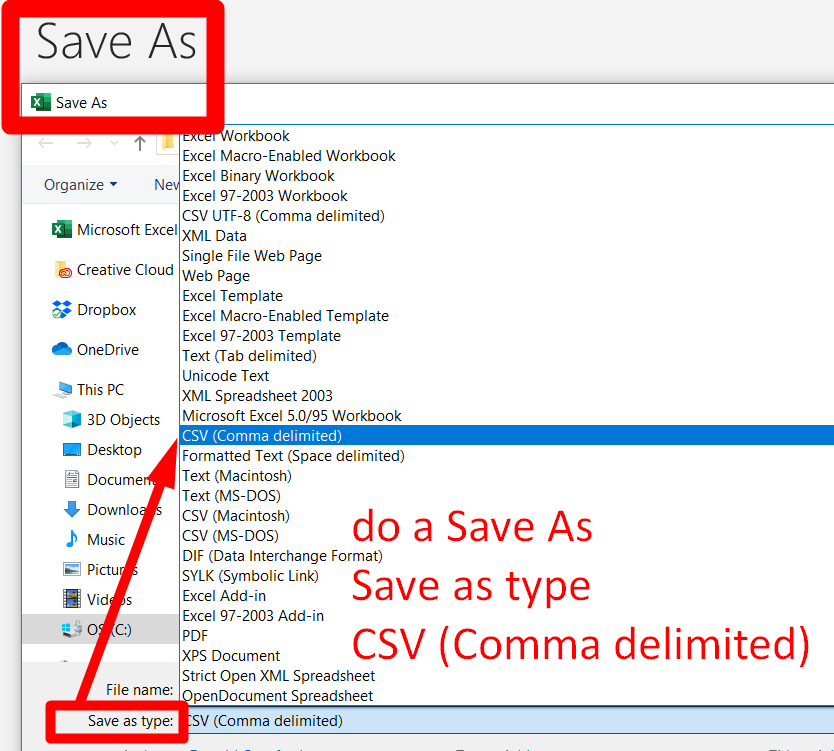 Once you have completed the file, use SAVE AS to save it to your computer. Choose the file type of a CSV (Comma delimited). Note: You work with it as an excel file, so when you’re done you have to choose Save As and from the Save as type find and choose CSV (Comma delimited) in the list. See what that looks like here.
If it still has .xlsx appended to the end of the file name then you didn’t save it in the CSV file type. Your file name should have .csv appended at the end if you did it right. If you don’t choose SAVE AS and select file type CSV (Comma delimited) then your file won’t import–guaranteed! Here’s where most people go wrong–because like me, I never even noticed there was such a thing as “file type” and had never used it to change the format of a file before.
Be sure to save the file somewhere you can find again, because you’ll need it again in the next step.
Task 3. Import the CSV file (3 steps to import)
 Import Step 1:

Now go back to the pop-up page labeled “Import Student Logins From CSV.” See it and do #3 “Choose file”
Browse to your file saved in the CSV file type (it MUST have .csv appended to the name of your file) you just saved on your computer and select it. Now the name of the file should show up in this box.
Import Step 2. Parse the file.
I don’t even know what this does, do you? At the bottom of the popup, after the directions is the “Parse CSV” button. But after you hit “Parse CSV” you’ll see a list of your students, if this is working for you.
 Import Step 3. Click the Import button.

The final import step requires you to scroll to the bottom of the list of your students and click on the blue button that says “Import Students.” Then they will be set up in the system.
If some of the rows are wrong, the system will tell you which rows have a problem. For example, some teacher mgr was not yet in the account. You can fix those rows, and then import again to finish the job.
 If it won’t work at all, you can use the red button on your Dashboard that says “Delete ALL students!” It is extreme. Do NOT do this if some classes have started working! Do not do this if you have already merged some teachers and their students into your account. Delete All Students will clear out ALL of your student data, allowing you to start over and re-import.
If you have a bunch of trouble, Delete All students! and send me your CSV file and I will do the import for you. But don’t do that until you have saved it as the file type that shows .CSV at the end. -Dr.Don
***BE KIND. Your students have to enter the username, passcode and Account number every time they login to play. So be kind and make these short, easy to remember, and easy to type in. Initials or nickname for username, a short word or 4 digits for a passcode.
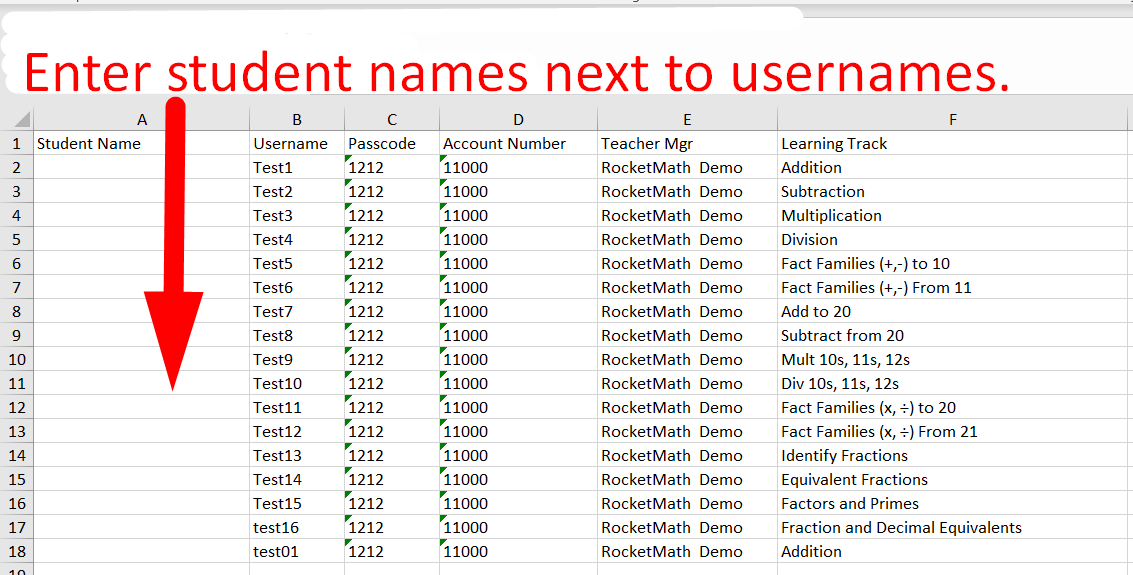
Be smart–export these usernames and save them with the students’ names.
You can create and keep a copy of the file and add the students’ names. Here’s how:

- Go to the dashboard and click on the “Export Functions” button. Choose Export Student Logins. (see above)
- Open the file that downloads to your computer. It will look something like the picture below.
- Type in your student’s names in Column A and save and print the file.