How Can We Help?
(A) Erase students (clear out logins and data)
 (1) Select the students whom you wish to change
When you want to change something for a group of students, you will use to the orange button on the right side above the names that say “Bulk Actions.” You will first have to select the students to whom the bulk action should apply. We’ll explain the functions below.
 To select the students put a check mark in the little box at the left hand side of their row. If that will be tedious, you can check the box next to “Select All Displayed,” a check mark will go onto all the students showing on your screen. But be sure they are all showing before you choose this.
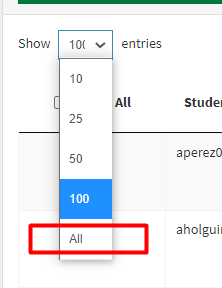 How many at a time do you want to see or export? Above the word Select you can choose how many of entries you want to show at a time on your screen. The Show entries options are: 10, 25, 50, 100 or All.
Or use the search bar to select who you want to see in your display. You can use the search bar to limit who shows up–for example entering a teacher’s name will display only her students. Then you can use “Select All” to put a check mark only in front of that teacher’s students.
(2) Go to Bulk Actions Button
Remember: on the Bulk Actions button somebody has to be selected (have checkmarks in front of their name) or nothing happens! Then there are several actions from which you can choose.
(3) Choose “Erase Student(s)”
Deletes the selected students, deletes their credentials and their progress records, and makes the seats available for different credentials for other students. If this is for a new school year, and you have many classes to do, you might want to use the Update Database button instead.